Showing posts with label DIY. Show all posts

Saturday, February 16, 2013

Crafturday: Lace Doily Collar

As a way to get back to blogging on a regular basis, I decided to start this weekly post. I love doing crafts, ever since I was a little kid. However, for the past few years I stopped making things and let my crafting supplies languish in my room. But in the past few months, I've been tapping back into my cratfy side and I want to share some of the projects I've been doing lately. 

This first project is a fairly easy project. No sewing machine required. In fact it can be a no-sew project if you want. 


Lace Collar Tops


Although lace collars have been around for the past few seasons, I can't get enough of them. I think have 4-5 of them sitting in my closet right now. But acquiring them can be costly, so here's an easy and inexpensive way to make your own with items you can find at the thift store or in your own closet.

Materials: 
  • Top or Sweater - you can use almost any neckline. Just make sure you have enough of the doily to cover a good portion of the top/sweater. 
  • Doily (or lace)
  • Fray Block
  • Needle and Thread (or fabric glue)
  • Straight pins
  • Sicssors  


 Directions:

  • Cut the doily in half. Note: The doily I have pictured below is the one I ended up not using when I realized I cut in half the wrong way. Oops! Luckily I had another one on hand I used pieces from the botched doily to make it longer. I also plan on using the scraps for another project. 
  • Take the fray block and run it against the cut portion of the doily.

  • Use straight pins to pin the doily to the collar area of the top. This is a good way to make sure the doily ends are centered in the middle.

  • Sew the doily to the top. Depending on what kind of doily (or lace) you use, you might need a sewing machine. I was able to hand sew on every top circle area. 


There you have it, a brand new lace collar top to wear! Check back next week to see another Crafturday project. 


Tuesday, June 12, 2012

Neon, Neon


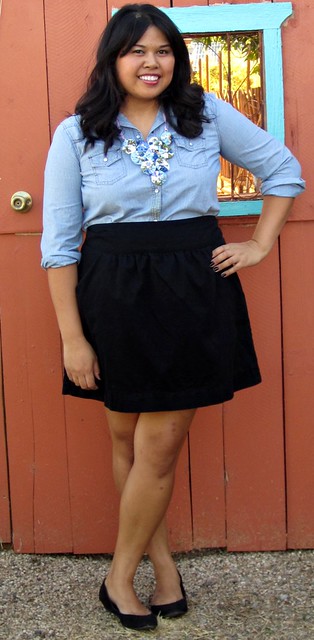
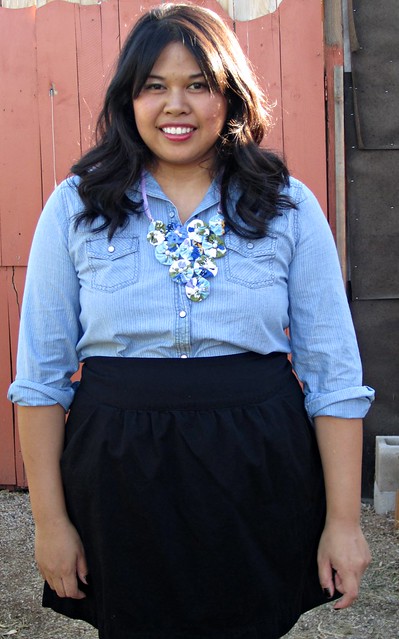
Chambray shirt, shirt (underneath), and sandals: Old Navy
Skirt (dyed): Target
Necklace: Forever 21
On my nails: China Glaze Frostbite with Sally Girl iridescent blue glitter 


I haven't blogged in a while, so what better way to get back into the swing of things with a no-fail outfit post.

This months Everybody, Everywear is neon. I don't really have neon in my closet and I didn't want to spend money on something I would probably wear once or twice. So I did the next best thing, I DIY'd it.


I have the ubiquitous lace skirt from Target that a lot of bloggers were wearing last year and with colored lace being popular this season, why not repurpose it? So I bought a box of Rit dye, in the brightest color I could find (besides yellow) and went to task of dying it. The box said it wasn't suitable for 100% polyester and synthetic fabrics, but I went for it anyway and I'm quite pleased with the results.
The slip didn't take to the dye too well, but I like how it's lighter than the lace. So now I have a brand new skirt that only cost me $2.29.

Don't forget to check out Everybody, Everywear to see how other bloggers styled their neon pieces.

Image 4970

Wednesday, February 22, 2012

Pumped Up Kicks

One of the first pictures that I pinned on my Pinterest were these glittery Miu Miu sneakers. 


I've been wanting to re-create them and I finally did this week. So my grungy looking Chucks went from this...


To this...


I used the tutorial from Honestly WTF to make these sparklers, but changed some things a bit. I didn't have the fancy rhinestones in settings so I used the regular rhinestones. Also I used gold ribbon for the laces. Since the shoes I used are slip-ons, I had to fake out the bottom three holes with the ribbon and some glue. Of course if you use full lace-ups, you won't run into this problem. 


This is a great way to give new life to an old pair of shoes. Plus if you hit the sales or use the coupons from your local craft store, you can do this project for under $15. 


 I'm so stoked with the way they turned out that I'll be wearing them when I go to Disneyland today!


Speaking of "Pumped Up Kicks", I came across this video of Zac Efron and Taylor Swift covering the Foster the People song on Ellen. Enjoy. 


Friday, December 9, 2011

Decisions, Decisions

With two weeks before Christmas, I have this slightly crazy plan that where I want to sew my dress I'll be wearing on the 25th. I have some sewing patterns and cloth just hanging out in my room and that just calling to be used. Plus I remember my mom sewing me and my sister's Christmas outfits when we were little, so it'll be nice to start that up again.
The thing is, there are three dresses that I want to sew, but I can't seem to pick one. So this is where you come in. I'll be doing a poll on where you get to pick which dress I will sew and I'll document the progress on the blog. 

Here are the three choices:


And this is the fabric I'll be using:

It's Halloween costume fabric I got last year and I thought it would be pretty fabric to make a dress out of. Plus I'm a sucker for star prints.

I put a poll in my side bar and you can vote on the pattern until Monday. Can't wait to see what everyone picks!

Thursday, November 3, 2011

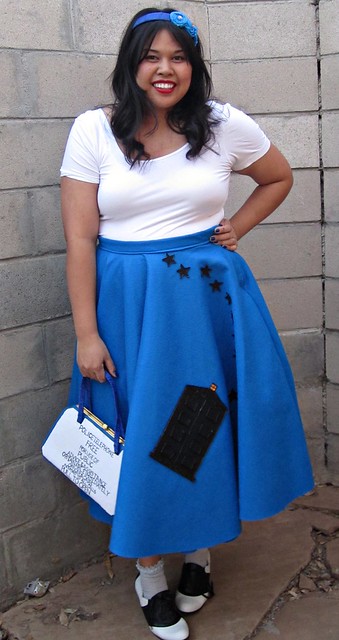
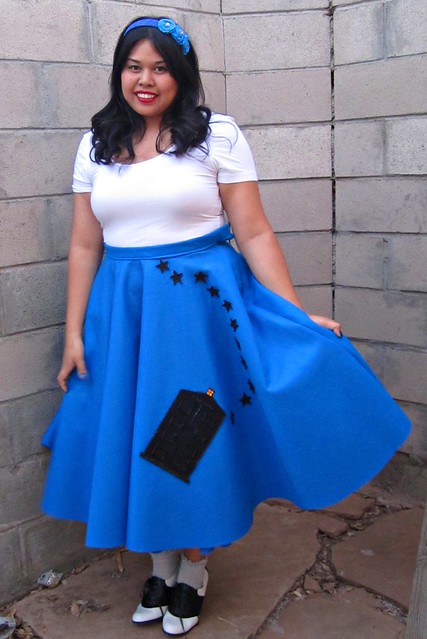
Whovian Wednesdays Bonus Post: My TARDIS Costume

 TARDIS Costume_6
Top: Old Navy
Skirt and Headband: Self-made
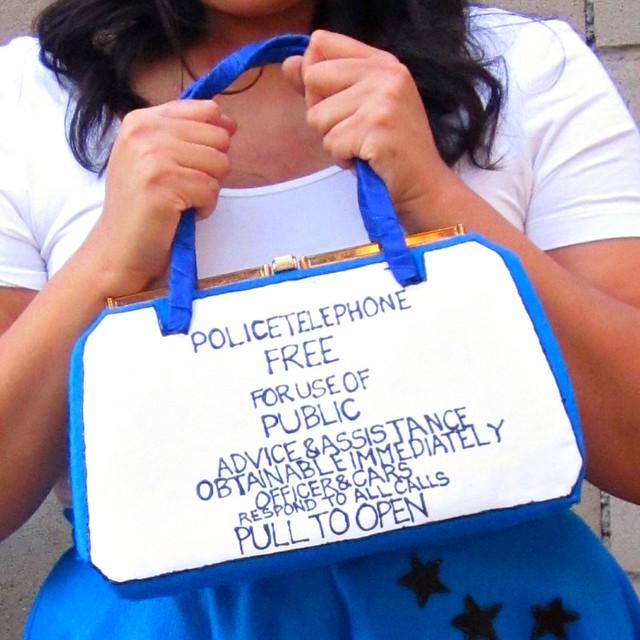
Purse: Thrifted and re-worked
Socks: Target
Saddle Shoes: Bass
TARDIS Costume_3

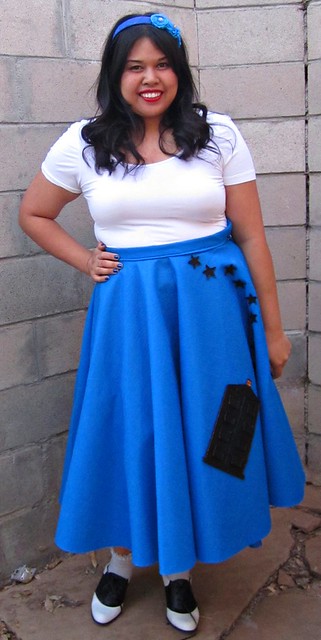
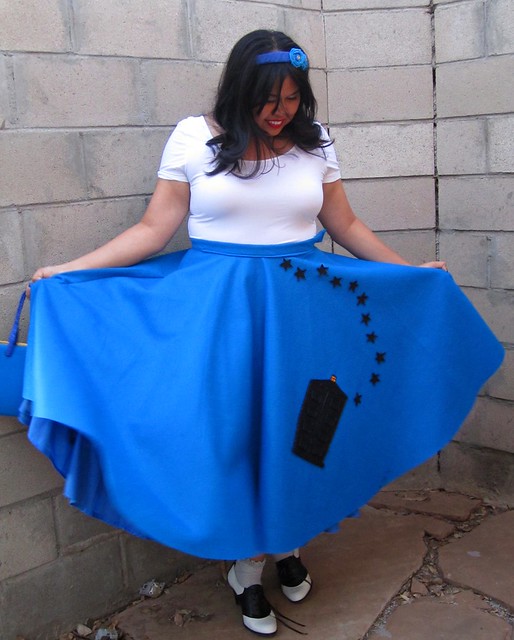
After many hours and a some revisions, here is what I wore for Halloween, my 50's inspired TARDIS costume. The skirt wasn't too hard to make besides having to sew the zipper which I'm still a novice at, but it was everything else that took a lot of time. The petticoat was the most time consuming, having to sew the rows and rows of tulle, but I like it much better than having to buy one. 


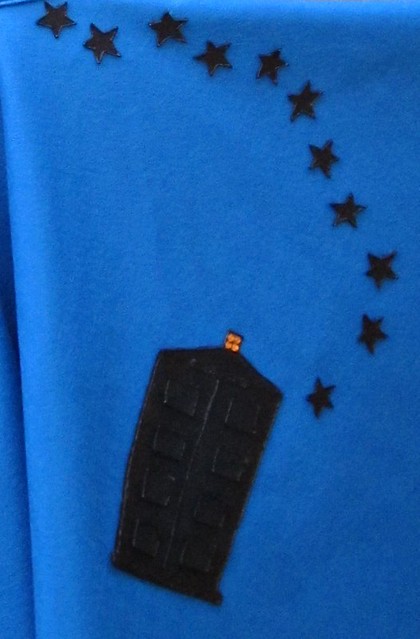
Then it came to how I was going to decorate the skirt. At first I wanted it to be like the TARDIS with panels on the front of the skirt. Instead, I decided to make a mimic the poodle appliques that usually are on a skirt like this. I made a TARDIS applique and had eleven stars following it. The stars represent the eleven Doctors.

TARDIS Costume _1

TARDIS Costume_5

I tried making two different type of light toppers for my head, but I wasn't feeling them. So I made some flowers out of the leftover felt, covered it with glitter, and yellow gems on the center part. The final thing was this purse made to look like the Police sign. I took a plain structured bag and covered it with felt and wrapped the handles with ribbon. I then took some white cloth to write out the sign. 

TARDIS Costume_7 


 TARDIS Costume_2
Overall I really like the way it turned out and now I have a costume I can wear to conventions. I'm also thinking of sewing up another skirt, perhaps a Guild version.

I also wanted to mention that I am the new Admin for the Tumblr site Matt Smith in Places He Shouldn't Be. It's the same as the David Tennant site, but with the 11th Doctor. The site has changed a lot of hands since it was created last month, I'm their third Admin, but I'll be there for the long haul. So follow me there and you can always submit things to the site.

Tuesday, October 11, 2011

Craftastic

whatiwore.10.11.11
Denim shirt and skirt: Old Navy
Necklace: handmade
Wedges: Payless

whatiwore_10.11.11_2

whatiwore.10.11.11_3

For this month's Everybody, Everywear it was all about the D.I.Y. and mine happens to be my necklace, one of the many things I have made over the summer. My whole room is one big craft corner right now with the current project being my Halloween costume. It's turning out really good so far, so I can't wait to get finished and show it to everyone. 

It's also the first time in a week that I wore something that wasn't an t-shirt and pj shorts. I tried doing the dress nice even if you are staying at home thing but in reality, I would much rather stay in my pjs all day than don fancier things. Especially if I'm going to be at home all day.  Let's just hope I'll something secured up during the holiday season where I don't look like I've been wearing the same geeky tee for the past 4 days.

Head over to Everybody, Everywear to see how my fellow bloggers channeled their inner craftiness and check out my tutorial on how to make the fabric doilies that I used to make my necklace.

DIY | Everybody, Everywear

Wednesday, September 28, 2011

Whovian Wednesdays: DIY TARDIS Bag

Since I've been writing about Doctor Who a lot lately, I thought I should make it a weekly column for all things Whovian. It's also a way to limit how much I talk about it here, so you dear readers don't sick of me writing about it. :P
For my first Whovian Wednesday post I want to show off a project I've been working on for the past week, my TARDIS totebag. I'm extremely happy with the way the bag turned out because on my first attempt I didn't do the proper measurements for the front piece and it looked like crap. So for my second attempt, I spent more time mapping out how I was going to recreate the front of the bag and it came out much better. There are still some things I want to improve for the next time I make one, but with doing any first time project, there's always crafting lessons to be learned. I plan on making another bag to either put in my shop or as a giveaway. Haven't decided yet.

 Measuring out the front door panels of the bag

The windows and police box sign

The front panel assembled 

TARDIS bag detail

The finished bag! Oh and it's bigger on the inside. ;P

Tuesday, September 20, 2011

Indian Summer

whatiwore.09.17.11
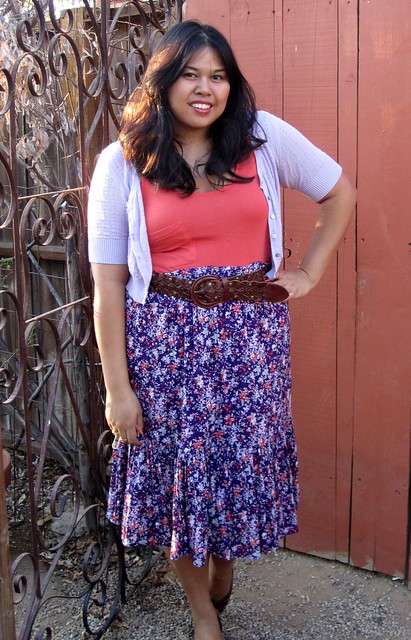
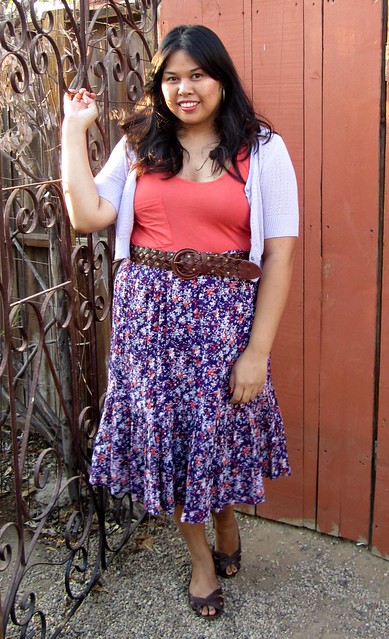
Cardigan, Skirt (re-worked dress), and belt: Old Navy
Tank: Alternative Apparel (won from Cheer contest)
Sandals: Hot Kiss via Famous Footwear

whatiwore.09.17.11_2

It may be the middle of September, but it still feels like August. I'm just ready for fall or cooler weather in general. My skirt was originally a dress but the top was not fitting right at all. I was about to put this in my give away pile when thought why not make change it to a skirt. It already had a elastic waistband so all I needed was a seam ripper and some sewing and now I have new skirt to wear. This little project is preparing me for this weeks visual Friend Friday where we showcase a reworked item, for I have a dress I've been wanting to alter for a while. Gotta get that started ASAP!


Saturday, September 10, 2011

That's Crafty! - How To Make Fabric Doilies

Last month, I wrote about the necklace I made from fabric doilies. I ended up getting a request from Jennifer of One Girl Geek on making a tutorial for it. So here it is!


What you'll need:
  • fabric (preferably cotton or cotton/blend)
  • needle and thread
  • some heavy paper or poster board
  • various circular lids
  • pencil or pen
  • scissors
  • straight pins (optional)


 Step One
Gather various sizes of circular lids (you can even use old cds) and trace the pattern on heavy paper or poster board. This will make the patterns last longer. I used old paper dividers for my patterns. You can make the patterns as big as you like but for smaller circles you don't want to go smaller than 2 3/4". Anything smaller will make it more difficult to assemble. Cut out the patterns.


Step Two
Lay the fabric on a flat surface and trace the patterns out with a pencil. You can also use a ball-point pen since the markings won't show, but don't use a marker since it will bleed into the fabric. Try to get the patterns as close as you can so you don't have lots of fabric remnants. The leftover fabric can be used for other projects or if you have a covered-button maker, you can use the scraps to make buttons for the middle of the doilies. You can make the doilies out of lace, tulle or any other lightweight fabric, but you'll have to stack the fabric on top of each other and pin the pattern to the fabric and cut around it. 


Step Three
Once you cut out the fabric, grab your needle and thread. As with any sewing project, you want your thread to match the fabric. It's also important that you have a really good medium sized knot. Anything smaller will break through the fabric as you are gathering. Also be careful with the needle. I have poked myself a few times and it's never fun. 
Your going to fold over a small piece of the fabric and do a running stitch. As you are doing this, you'll gather the top fabric together. Keep doing these two steps until you reached the starting point of the stitch.


Step Four
Once you reached the starting point of the stitch, make sure the gathering is tight. Once that is done, run the needle from one of the gathers to the center a few times just make sure it won't unravel. After knotting it two-three times, you have yourself a doily.


You can use them to make necklaces, or depending on the size, you can even use them to make pillow covers, coverlets or even as clothing. This is also a good way to up-cycle a favorite piece of clothing that is beyond repair. The possibilities are endless! 


If you do decided to make these doilies e-mail me pictures and I'll post them on the blog. I would love to see to what you craft out of them!


Tuesday, March 2, 2010

Seven Things

Since returning to singleton status, I've had more free time on my hands. But instead of taking of advantage of this, I've been squandering it by being lazy. You can only watch so much home improvement and food shows before the mind starts to reel.  

So I decided that in the next 7 months, I will:
  1. Read more -  the last time I read a book was a year ago.
  2. Take a dance class - perhaps tap or salsa.
  3. Sew a dress - the last time I sewed a dress was 8 years ago. 
  4. Start going to the gym - my high school reunion is 6 months away. Eek!
  5. Learn how to knit -  if I'm successful, all my family and friends will be getting scarves and beanies. :P
  6. Start my Etsy store - hopefully I can get this up and running by the end of this month.
  7. Take more mini-road trips - it'll be fun to explore the nearby cities and find cool vintage/thrift stores. Plus I've been partly inspired by this guy

Do you have things that you want to accomplish? 

Monday, February 22, 2010

Bows on My Fingers, Bows on My Toes

About a month ago, I posted about these Opening Ceremony beauties

They happen to be way out of my price range. However a light bulb went off and I realized can I turn this into a diy project.  
I happen to score these Faryl Robin wedges at Daffy's in NYC about a year ago for only $10. The criss-cross straps are the perfect base to add bows. 

 
 So after 16 ft of ribbon, and a few hours of sewing while switching between watching Ice Dancing on the Olympics and Masterpiece Theaters most current adaption of Jane Austen's Persuasion, I finished these cuties...


They are not exactly like the Opening Ceremony ones, but they're in the same spirit. Plus they look so cute and whimiscal on. 
I hot glued the bows to the shoes. I'm thinking of getting shoe clips to attach the bows, but I might just keep it how it is. 
 

These will be my statement shoes. I'm going to see what other shoes are being underutilized in my closet for more diy projects. 

Also about a week ago, Sara from LuShae Jewelry contacted me and I got to pick a piece from their website. They had some wonderful necklaces, rings and earrings, but I decided to pick a ring. I don't usually wear rings, I chose this super cute dangling heart bow ring.


It's the perfect size that I can wear it everyday although I wish the bow was at little bit bigger. But other than that, really like it and I've already gotten compliments on it.
It also came in a nice box, perfect for gifting.